Interfacing Built-in LCD with ATmega2560
Introduction
LCD (Liquid Crystal Display) is a popular output device that can display characters, numbers, and even graphical information. Interfacing an LCD with the ATmega2560 development board allows you to display information and create user interfaces for your projects. This guide will walk you through the steps to interface an LCD with the ATmega2560 board.
Problem Statement
Interfacing built-in LCD with ATmega2560 development board.
Requirements
- ATmega2560 development board.
- Micro USB cable
- 16X2 LCD
- Potentiometer (built-in)
Working
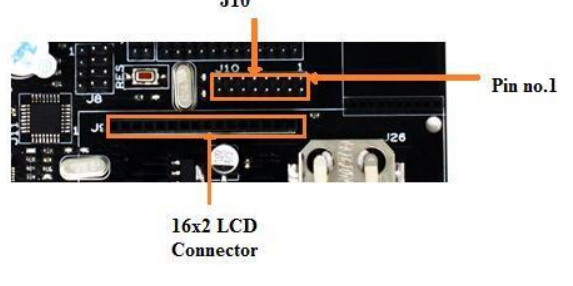
- To enable the LCD connect jumpers to all pins of J10. The contrast of LCD can be varied using the inbuilt Potentiometer.
- The LCD module works based on the HD44780 controller, which allows communication with the Atmega2560 board using a parallel interface.
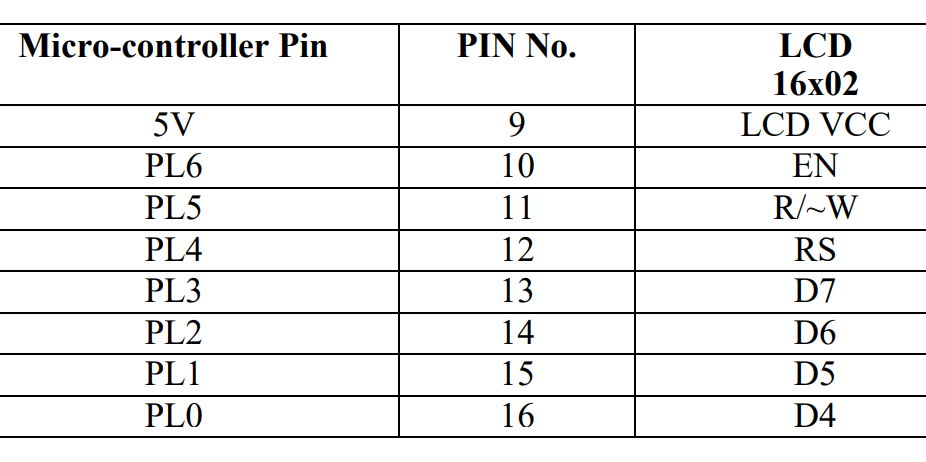
- The control and data signals are sent to the LCD module through the digital pins of the Atmega2560.
- The RW pin is grounded to set the LCD in write mode. The RS pin is used to select the register (command or data) to be written to. The EN pin enables the LCD module to read the incoming signals.
- A potentiometer is connected to VEE pin of the LCD, it is used to set the contrast of the LCD.
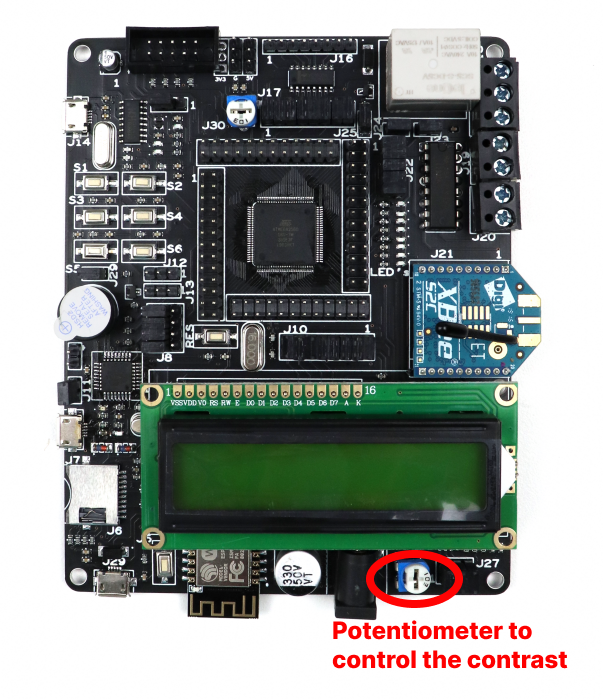
Component Placement
Code
- Open VS Code and paste the code into the file named main.c
- Additionally, download the library for LCD from here into the workspace of your project. (Note it is a zip file, so you extract use the main.c file to flash into ATmega2560)
- To compile and convert this into hex run the following command in your terminal:
avr-gcc -Wall -g -Os -mmcu=atmega2560 -o lcd_main.hex main.c#ifndef F_CPU
#define F_CPU 16000000UL // set the CPU clock
#endif
#include <avr/io.h>
#include <util/delay.h>
#include "lcd.c"
int main(void)
{
LCD_Init();
LCD_Line_Column(1, 3); // LCD initialization in 4-bits mode
LCD_WriteString("Origami With"); // send this string
_delay_ms(1000); // delay 1s
LCD_Line_Column(2, 3); // go to second line and first column
_delay_ms(1000); // delay 1s
LCD_WriteString("Electronics"); // send this string
while (1)
{
}
}- Now open AVRDUDES and from the Programmer (-c) dropdown select Any usbasp clone with the correct VID/PID
- In the Flash section, click on three dots and navigate to the desired hex file, and select it. Finally, click on Program to burn the hex file in the microcontroller.
Output
Upon successful interfacing and code execution, the LCD module will display "Origami with electronics". You can use the custom functions to control the cursor, clear the display, and print characters or strings on the LCD. The contrast of the LCD can be adjusted using the potentiometer.
Conclusion
Interfacing an LCD with the ATmega2560 development board allows you to display information and create user interfaces for your projects. By following the steps outlined in this guide, you should be able to successfully interface the LCD module with the ATmega2560 and display desired content on the LCD screen