Interfacing LCD with Raspberry Pi
Introduction
Problem Statement
Requirements
- Raspberry Pi
- 16x2 LCD module
- Potentiometer
- Jumper wires
- Breadboard
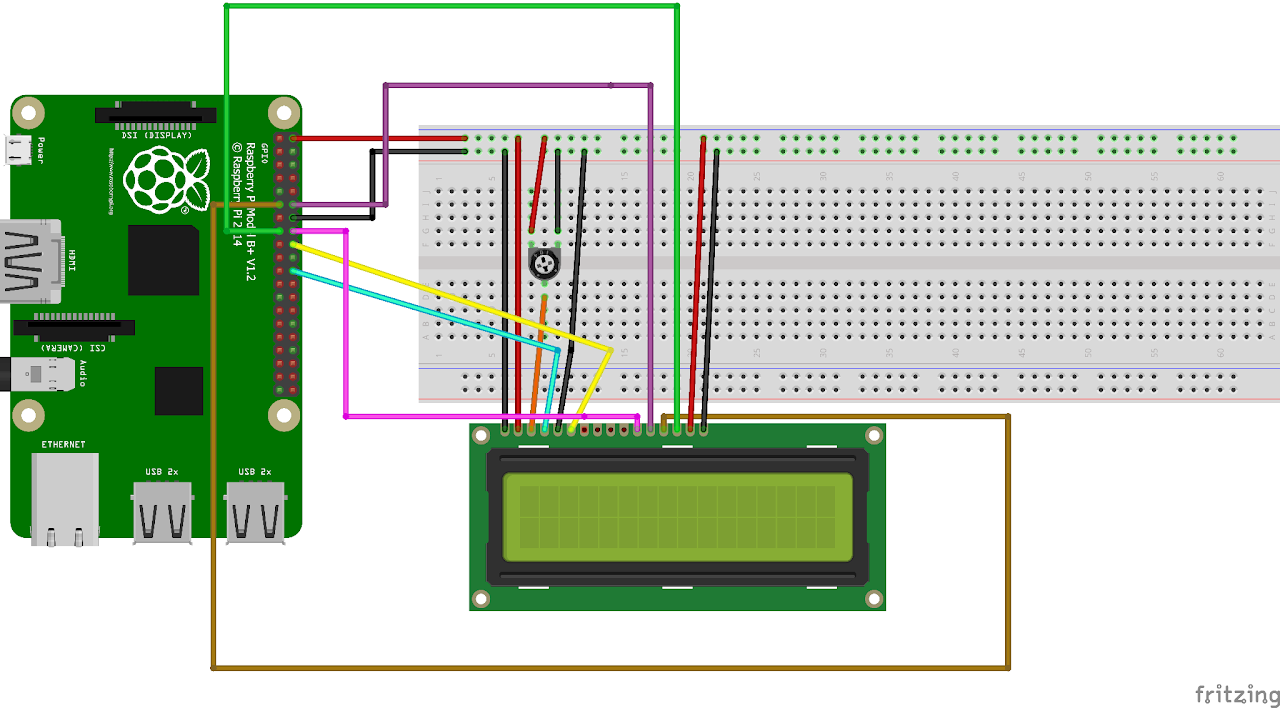
Circuit Diagram
- Pin 1(Ground) of LCD goes to the GND(PIN 14) of Raspberry Pi.
- Pin 2(VCC/5V) of LCD goes to the +5V(PIN 2) of Raspberry Pi.
- Pin 3(V0) of LCD goes to the middle pin of potentiometer.
- Positive(+5V) rail of breadboard goes to the positive terminal of potentiometer.
- GND rail of breadboard goes to the negative terminal of potentiometer.
- Pin 4(RS) of LCD goes to the GPIO 25(PIN 22) of Raspberry Pi.
- Pin 5(RW) of LCD goes to the GND rail of breadboard.
- Pin 6(EN) of LCD goes to the GPIO 24(PIN 18) of Raspberry Pi.
- Pin 11(D4) of LCD goes to the GPIO 23(PIN 16) of Raspberry Pi.
- Pin 12(D5) of LCD goes to the GPIO 17(PIN 11) of Raspberry Pi.
- Pin 13(D6) of LCD goes to the GPIO 18(PIN 12) of Raspberry Pi.
- Pin 14(D7) of LCD goes to the GPIO 22(PIN 15) of Raspberry Pi.
- Positive(+5V) rail of breadboard goes to the positive terminal of LCD.
- GND rail of breadboard goes to the negative terminal of LCD.
Code:
Now let's write the Python code for LCD . Follow the steps below:
- Connect to your Raspberry Pi using VNC or Desktop environment.
- Launch the Geany Python IDE or open a text editor to write the code.
- Create a new file named
lcd.pyand save the following code into it: - Open the raspberrypi terminal and install the Adafruit_CharLCD using pip install Adafruit_CharLCD command
- You can copy and paste the following code from here into the file.
import time
import Adafruit_CharLCD as LCD

# Raspberry Pi pin setup

lcd_rs = 25
lcd_en = 24
lcd_d4 = 23
lcd_d5 = 17
lcd_d6 = 18
lcd_d7 = 22
lcd_backlight = 2

# Define LCD column and row size for 16x2 LCD.
lcd_columns = 16
lcd_rows = 2
lcd = LCD.Adafruit_CharLCD(lcd_rs, lcd_en, lcd_d4, lcd_d5,

                           lcd_d6, lcd_d7, lcd_columns, lcd_rows, lcd_backlight)

lcd.message('Origami with\nElectronics!')
# Wait 10 seconds
time.sleep(10.0)
lcd.clear()
Once you have pasted the code execute it by clicking on messenger like icon.
After saving the file execute it by clicking on messenger like icon on geany editor or open terminal and navigate to the folder you saved the file, execute it by typing python waterlevel.py
Output
LCD will print the line "Origami with" on its first line and "Electronics on its second line.
Conclusion
In this tutorial, you have acquired the knowledge and skills to utilize a push button to control an LCD (Liquid Crystal Display) on a Raspberry Pi. By following the steps outlined in this tutorial, you have successfully wired the components, written the required Python code, and achieved the ability to display dynamic content on the LCD. This project unleashes a multitude of possibilities for incorporating interactive user interfaces using an LCD in your Raspberry Pi projects. Whether it's creating menu systems, displaying sensor data, or presenting real-time information, you now have the tools to take your projects to the next level.