Interfacing LCD with P89V51RD2
Introduction
In this guide, we will demonstrate how to interface a 16x2 LCD (Liquid Crystal Display) with 8051 microcontroller. The LCD will be used to display text and provide visual feedback in your 8051 projects. We will write C code to initialize the LCD and control its operations, such as displaying text and moving the cursor. This project can be useful for creating user interfaces, data visualization, and system status displays.
Refer following documents for more information about LCD:
Problem Statement
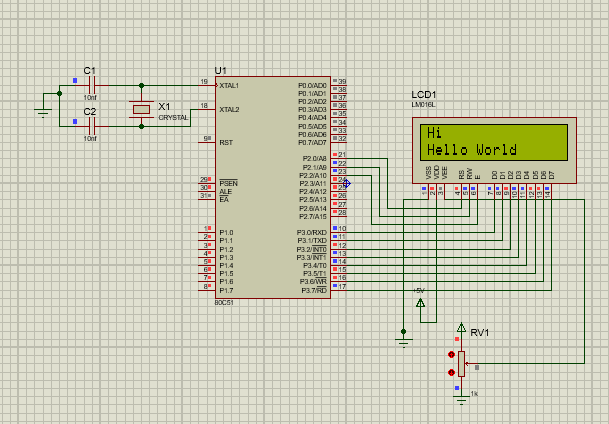
The objective is to create a circuit to interface LCD with 8051 board and write a program to display 'Hi' on first line and 'Hello World' on second line of the LCD screen.
Requirements
- P89V51RD2
- Breadboard
- 16X2 LCD
- Potentiometer(10K ohm)
- Jumper wires
About LCD
The LCD 16x2 is a 16-pin device that comprises of 8 data pins (D0-D7) and 3 control pins (RS, RW, EN). The remaining 5 pins are used for supply and backlighting functionality of the LCD. The control pins play a vital role in accessing LCD command register or data register, as well as determining the read or write operation. The LCD can be utilized in either 4-bit mode or 8-bit mode, depending on the specific requirements of the application. To use the LCD effectively, certain commands need to be sent to the LCD. Once the LCD is configured according to our requirements, we can transmit the desired data.
Circuit Diagram
Code
- Copy and paste the following code into main.c or download it from here:
c
#include <reg51.h>

sfr lcd_data_port = 0xB0;             //0xB0 is address of Port3 which is used for D0-D7
sbit rs = P2 ^ 0;                     //Register select pin
sbit rw = P2 ^ 1;                     //Read/Write pin
sbit en = P2 ^ 2;                     //Enable pin

void delay(unsigned int count)        //Function to provide delay Approx 1ms
{
    int i, j;
    for (i = 0; i < count; i++)
        for (j = 0; j < 112; j++);
}

void LCD_Command(unsigned char cmd)   //LCD command function
{
    lcd_data_port = cmd;
    rs = 0;			//select command register
    rw = 0;			//select write mode
    en = 1;			//provide high on enable pin
    delay(1);
    en = 0;			//provide low on enable pin
    delay(5);
}

void LCD_Char(unsigned char char_data)   //LCD data write function
{
    lcd_data_port = char_data;
    rs = 1;			//select data register
    rw = 0;			//select write mode
    en = 1;			//provide high on enable pin
    delay(1);
    en = 0;			//provide low on enable pin
    delay(5);
}

void LCD_String(unsigned char *str)   //send string to LCD function
{
    int i;
    for (i = 0; str[i] != 0; i++)
    {
    LCD_Char(str[i]);
    }
}

void LCD_Init(void)                  //LCD initialize function
{
    delay(20);
    LCD_Command(0x38);              //Initialization of 16X2 LCD in 8bit mode
    LCD_Command(0x0C);              //Display ON Cursor OFF
    LCD_Command(0x06);              //Auto Increment cursor
    LCD_Command(0x01);              //clear display
    LCD_Command(0x80);              //cursor at home position
}

void main()
{
    LCD_Init();                    //initialization of LCD
    LCD_String("Hi");              //write string on first line of LCD
    LCD_Command(0xC0);             //next line
    LCD_String("Hello World");     //write string on second line of LCD
    while (1);
}
Output
After flashing the code, the LCD will display "Hi" on first line and "Hello world" on second line.
Conclusion
In conclusion, interfacing an LCD with the 8051 microcontroller enables the creation of user-friendly embedded systems with visual output capabilities. It allows for the display of relevant information, status updates, and interactive interfaces, enhancing the usability and functionality of the overall system.