Interfacing Soil Moisture Sensor with Raspberry Pi
Introduction
In this guide, we will explore the HW-080 soil moisture sensor and its usage with a Raspberry Pi. The HW-080 sensor is designed to measure the moisture content in soil, providing valuable information for plant irrigation and environmental monitoring. By connecting the HW-080 sensor to the Raspberry Pi and leveraging Python programming, we can accurately measure the soil moisture level and create intelligent irrigation systems or optimize plant care. This sensor is widely used in applications such as smart agriculture, garden automation, and indoor plant monitoring. With the HW-080 soil moisture sensor and the power of the Raspberry Pi, we can ensure optimal plant growth and resource utilization. Let's get started and learn how to wire the HW-080 soil moisture sensor to the Raspberry Pi and retrieve soil moisture data using Python programming.
Problem Statement
The objective is to create a circuit using a HW-080 sensor that can detect soil moisture.
Requirements
- Raspberry Pi
- Breadboard
- HW-080 sensor module
- MCP-3008
- HW-103 module
- Jumper wires
Working
To measure soil moisture using the Raspberry Pi with MCP-3008 and both the HW-080 and HW-103 soil moisture sensors, you can connect the sensors to the MCP-3008 analog-to-digital converter (ADC) and interface it with the Raspberry Pi using the SPI (Serial Peripheral Interface) protocol.
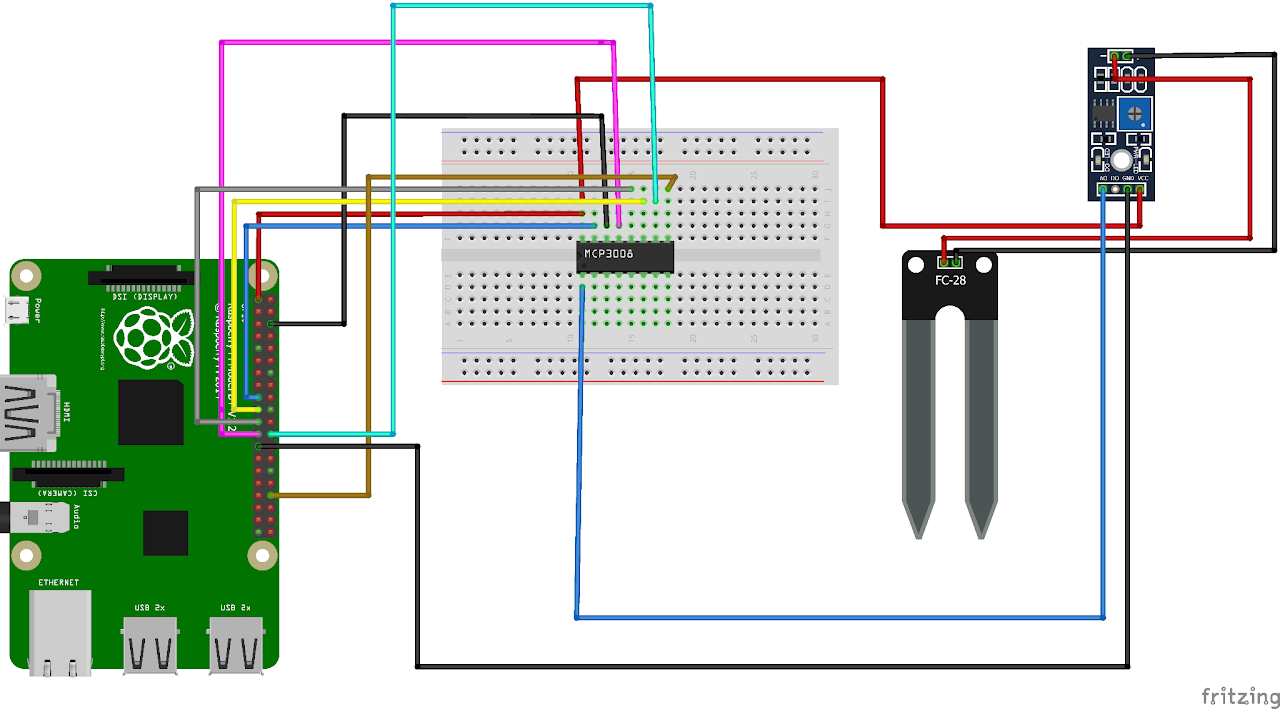
Circuit Diagram
- Connect the VDD(PIN 16) of MCP-3008 to 3V3(Pin 1) of RPi
- Connect the VREF(PIN 15) of MCP-3008 to 3V3(Pin 17) of RPi
- Connect the AGND(PIN 14) of MCP-3008 to GND(Pin 6) of RPi
- Connect the CLK(PIN 13) of MCP-3008 to GPIO11(Pin 23-SCLK) of RPi
- Connect the DOUT(PIN 12) of MCP-3008 to GPIO9(Pin 21-MISO) of RPi
- Connect the DIN(PIN 11) of MCP-3008 to GPIO10(Pin 19-MOSI) of RPi
- Connect the SHDN(PIN 10) of MCP-3008 to GPIO8(Pin 24-CEO) of RPi
- Connect the DGND(PIN 9) of MCP-3008 to GND(Pin 34) of RPi
- Connect the CH0(PIN 1) of MCP-3008 to A0 of HW-103
- Connect the GND(Pin 25) of raspberry pi to GND of HW-103
- Connect the same line of VDD(PIN 16) of MCP-3008/any 3V3 pin of raspberry pi to VCC of HW-103
- Connect the positive terminal of HW-103 to positive terminal HW-080
- Connect the negative terminal of HW-103 to negative material HW-080
Enabling SPI
- Open the terminal
- Update the package list then upgrade the packages, by using the command
cmd
sudo apt update
sudo apt full-upgrade- Once your Raspberry Pi has finished updating, we can install the SPI tools
cmd
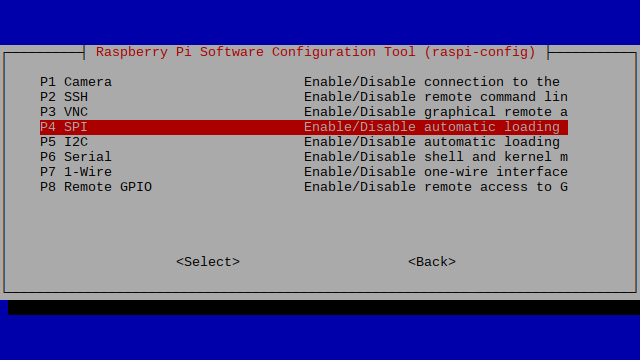
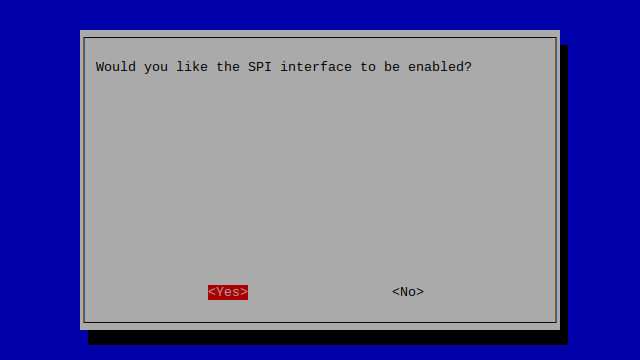
sudo apt install -y spi-tools- To enable support for SPI, we will need to use the raspi-config tool. Launch the config tool by running the following command.
cmd
sudo raspi-configWhile you are within this tool, you can use the ARROW keys to navigate and the ENTER key to select.
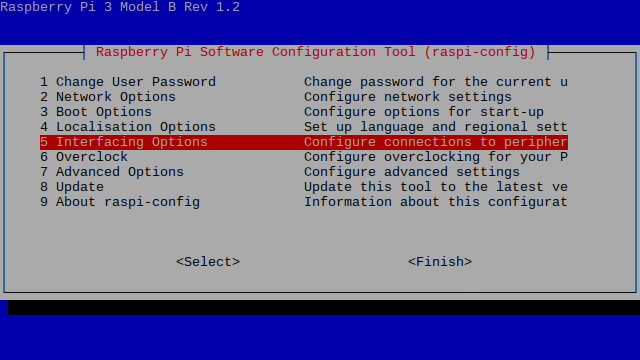
Navigate to FINISH and press ENTER.
- For our changes to take effect, we need to restart our Raspberry Pi.
To restart the Raspberry Pi, all we need to do is use the command below.
cmd
sudo rebootSPI is enabled.
Code
Now let's write the Python code to detect the soil moisture. Follow the steps below:
- Connect to your Raspberry Pi using VNC or Desktop environment.
- Launch the Geany Python IDE or open a text editor to write the code.
- Create a new file named soilmoisture.py and save the following code into it
- Open the raspberrypi terminal and install the spidev using
pip install spidevcommand. - You can copy and paste the following code from here into the file.
py
import spidev
import time

# Define SPI bus and device (chip enable pin)
spi = spidev.SpiDev()
spi.open(0, 0)  # (bus, device)

def read_soil_moisture(channel):
    # Sending start bit, single-ended channel selection, and null bits
    adc_data = spi.xfer2([1, (8 + channel) << 4, 0])
    raw_value = ((adc_data[1] & 3) << 8) + adc_data[2]  # Combining the received bits
    # Calculating the percentage value
    percentage = int(((1023 - raw_value) / 1023.0) * 100)
    return percentage

try:
    while True:
        # Assuming the soil moisture sensor is connected to channel 0
        moisture_level = read_soil_moisture(channel=0)
        print("Soil Moisture Level: {}%".format(moisture_level))
        time.sleep(0.1)  # Delay between readings
except KeyboardInterrupt:
spi.close()- After saving the file execute it by clicking on messenger like icon on geany editor or open terminal and navigate to the folder you saved the file, execute it by typing python
soilmoisture.py
Output
The HW-080 sensor and HW-103 provides the soil moisture values of the soil with Raspberry Pi.
Conclusion
By following this guide, you have learned how to interface a soil moisture sensor with a Raspberry Pi. You have successfully wired the HW-103 or HW-080 sensor to the Raspberry Pi and written Python code to read the soil moisture data. With this knowledge, you can now accurately monitor and manage soil moisture levels for various applications. Whether you're interested in smart agriculture, garden automation, or indoor plant care, the HW-103 or HW-080 soil moisture sensor provides reliable and precise measurements. You can further enhance your projects by integrating the soil moisture sensor with other sensors or implementing automated irrigation systems based on the moisture conditions. Enjoy exploring and experimenting with the HW-103 or HW-080 soil moisture sensor on your Raspberry Pi to optimize plant growth and create efficient resource management solutions!