Interfacing Built-in LED with ATmega2560
Introduction
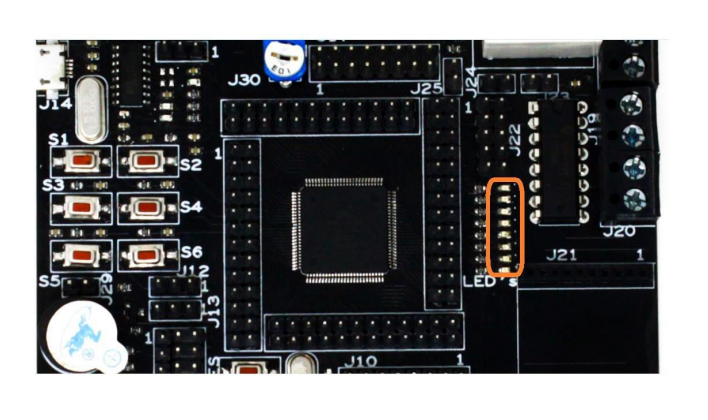
This guide will walk you through the process of interfacing the built-in LED of the ATmega2560 microcontroller using Embedded C programming. By following these steps, you will be able to control the LED and demonstrate basic output functionality. The Development board has 8 built-in LEDs connected to port "C" of ATmega2560, we will use them in this tutorial.
Problem Statement
The ATmega2560 microcontroller comes with 8 built-in LEDs connected to port "C". The goal is to write a program that can turn the LEDs on and off, showcasing the control of a basic output device.
Requirements
- ATmega2560 development board.
- Micro USB cable
- LED (built-in)
Working
- Set port C as the output by giving FF to DDRC.
- Turn on the LED by giving 0xFF to port C.
- Provide a delay of 500 milliseconds (ms) using _delay_ms () function.
- Turn off the LED by giving 0x00 to port C, again give a delay of 500ms and put it in a loop.
Component Placement

Code
- Open VS Code and paste the code into the file named LED.c
- To compile and convert this into hex, run the following command in your terminal-
avr-gcc -Wall -g -Os -mmcu=atmega2560 -o blink_led.hex LED.cYou can download the code form here.
#ifndef F_CPU
#define F_CPU 16000000UL // set the CPU clock
#endif

#include <avr/io.h>     // Standard AVR IO Library
#include <util/delay.h> // Standard AVR Delay Library

int main(void)
{
    DDRC = 0Xff; // set the port as OUTPUT
    while (1)
    {
        PORTC = 0xff;   // setting all the pins of port c
        _delay_ms(500); // delay of 500 ms
        PORTC = 0x00;   // resetting all the pins of port c
        _delay_ms(500);
    }
}- Now open AVRDUDES and from the Programmer (-c) dropdown select Any usbasp clone with the correct VID/PID
- In the Flash section, click on three dots and navigate to the desired hex file, and select it. Finally, click on Program to burn the hex file in the microcontroller.
Output
Upon successful programming and execution of the code, the built-in LEDs will turn on and off alternately at an interval of 500 ms.
Conclusion
By following this guide, you have successfully interfaced the built-in LED of the ATmega2560 microcontroller using Embedded C. You can now control the LED and customize the program to achieve different blinking patterns or integrate it into more complex projects.
