Interfacing Color Sensor with Raspberry Pi
Introduction
In this experiment, we will explore how to interface a color sensor with the Raspberry Pi 3B+. The color sensor enables us to detect and measure colors in our environment. By using the GPIO (General Purpose Input/Output) pins on the Raspberry Pi, we can establish a connection with the color sensor and gather color information. With this data, we can create various applications or automation systems that respond to different colors. In this tutorial, we will learn how to read color values from the sensor and use them to trigger specific actions or display color information. By following this guide, you will gain the necessary knowledge to integrate a color sensor with the Raspberry Pi and explore a wide range of color-based projects.
Problem Statement
The objective of this project is to interface color sensor using Raspberry Pi 3B+ and detect the color of object in RGB.
Requirements
- Raspberry Pi
- Color Sensor
- Jumper wires
- Breadboard
Working
The color sensor can be utilized with a Raspberry Pi 3B+ to detect RGB colors and display the value on terminal.
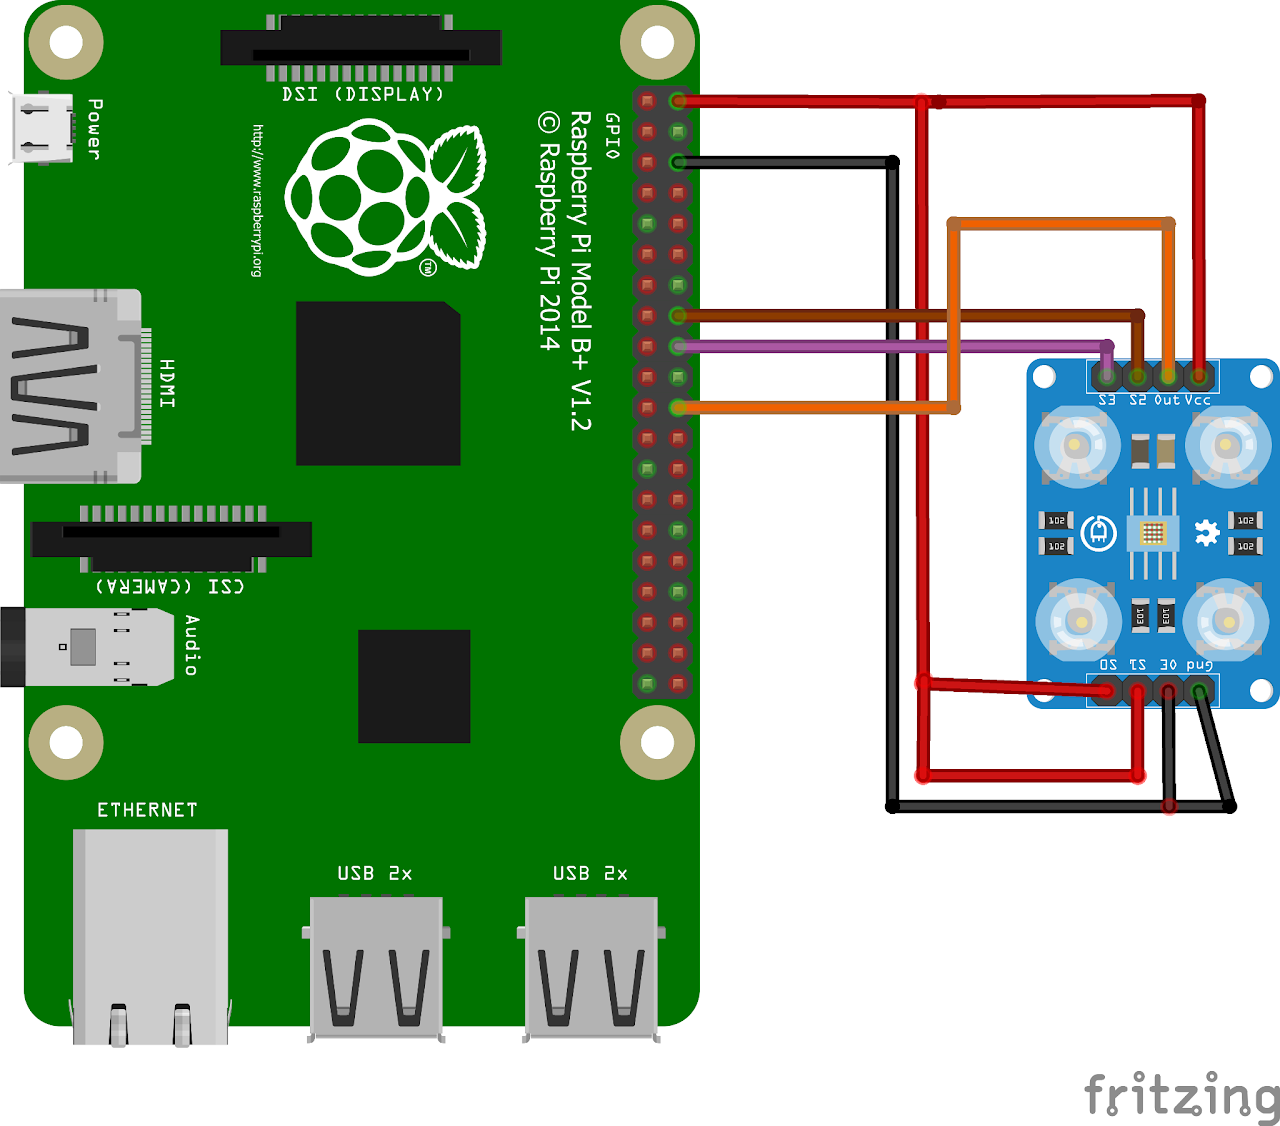
Circuit Diagram
- Connect the VCC of color sensor to +5V(Pin 2) of RPi.
- Connect the S0 of color sensor to +5V(Pin 2) of RPi.
- Connect the S1 of color sensor to +5V(Pin 2) of RPi. (breadboard can be used for connections)
- Connect the GND of color sensor to GND(Pin 6) of RPi.
- Connect the OE of color sensor to GND(Pin 6) of RPi.
- Connect the S2 of color sensor to GPIO23(Pin 16) of RPi.
- Connect the S3 of color sensor to GPIO24(Pin 18) of RPi.
- Connect the Out of color sensor to GPIO25(Pin 22) of RPi.
Code
Now let's write the Python code to detect detect color of an object. Follow the steps below:
- Connect to your Raspberry Pi using VNC or Desktop environment.
- Launch the Geany Python IDE or open a text editor to write the code.
- Create a new file named
colorsensor.pyand save the following code into it - You can copy and paste the following code from here into the file.
py
import RPi.GPIO as GPIO
import time

s2 = 23
s3 = 24
result = 25
NUM_CYCLES = 10


def setup():
    GPIO.setmode(GPIO.BCM)
    GPIO.setup(result, GPIO.IN, pull_up_down=GPIO.PUD_UP)
    GPIO.setup(s2, GPIO.OUT)
    GPIO.setup(s3, GPIO.OUT)
    print("\n")

def loop():
    temp = 1
    while(1):
        GPIO.output(s2, GPIO.LOW)
        GPIO.output(s3, GPIO.LOW)
        time.sleep(0.05)
        start = time.time()
        for impulse_count in range(NUM_CYCLES):
            GPIO.wait_for_edge(result, GPIO.FALLING)
        duration = time.time() - start
        red = NUM_CYCLES / duration
        print("red value - ", red)

        GPIO.output(s2, GPIO.LOW)
        GPIO.output(s3, GPIO.HIGH)
        time.sleep(0.3)
        start = time.time()
        for impulse_count in range(NUM_CYCLES):
            GPIO.wait_for_edge(result, GPIO.FALLING)
        duration = time.time() - start
        blue = NUM_CYCLES / duration
        print("blue value - ", blue)

        GPIO.output(s2, GPIO.HIGH)
        GPIO.output(s3, GPIO.HIGH)
        time.sleep(0.3)
        start = time.time()
        for impulse_count in range(NUM_CYCLES):
            GPIO.wait_for_edge(result, GPIO.FALLING)
        duration = time.time() - start
        green = NUM_CYCLES / duration
        print("green value - ", green)
        time.sleep(2)

def endprogram():
    GPIO.cleanup()


if __name__ == '__main__':

    setup()
    try:
        loop()

    except KeyboardInterrupt:
endprogram()- After saving the file execute it by clicking on messenger like icon on geany editor or open terminal and navigate to the folder you saved the file, execute it by typing python
colorsensor.py
Output
The RGB value will be displayed as output on terminal and the highest RGB value among the colors red, green and blue colors will be the color of the object.
Conclusion
By following this guide, you have gained the knowledge to utilize a color sensor with a Raspberry Pi. You have successfully connected the color sensor, written the necessary Python code, and obtained the ability to detect and measure colors using the sensor. This opens up a wide range of possibilities for incorporating color detection capabilities into your Raspberry Pi projects. You can now explore and experiment with various applications, such as building a color-based sorting system, creating a color recognition system for objects or images, or even developing a smart home setup that responds to different colors for ambient lighting or visual notifications. The integration of a color sensor with a Raspberry Pi empowers you to enhance your projects with intelligent color sensing capabilities. Let your creativity flow and enjoy exploring the potential of color sensors in your Raspberry Pi endeavors!