Controlling a Push Button on Raspberry Pi
Introduction
In this detailed guide, we will walk you through the process of using a push button to control an LED on a Raspberry Pi. The objective is to make the LED turn on when the push button is pressed and turn off when it is released. By following this guide, you will learn how to wire the push button and LED to the Raspberry Pi and write a Python program to control the LED based on the button's state.
Problem Statement
The goal is to create a circuit that allows us to control an LED using a push button. When the button is pressed, the LED should turn on, and when the button is released, the LED should turn off.
Requirements
- Raspberry Pi
- Breadboard
- LED
- Push button
- Resistor (220-330 ohms)
- Jumper wires (M-F)
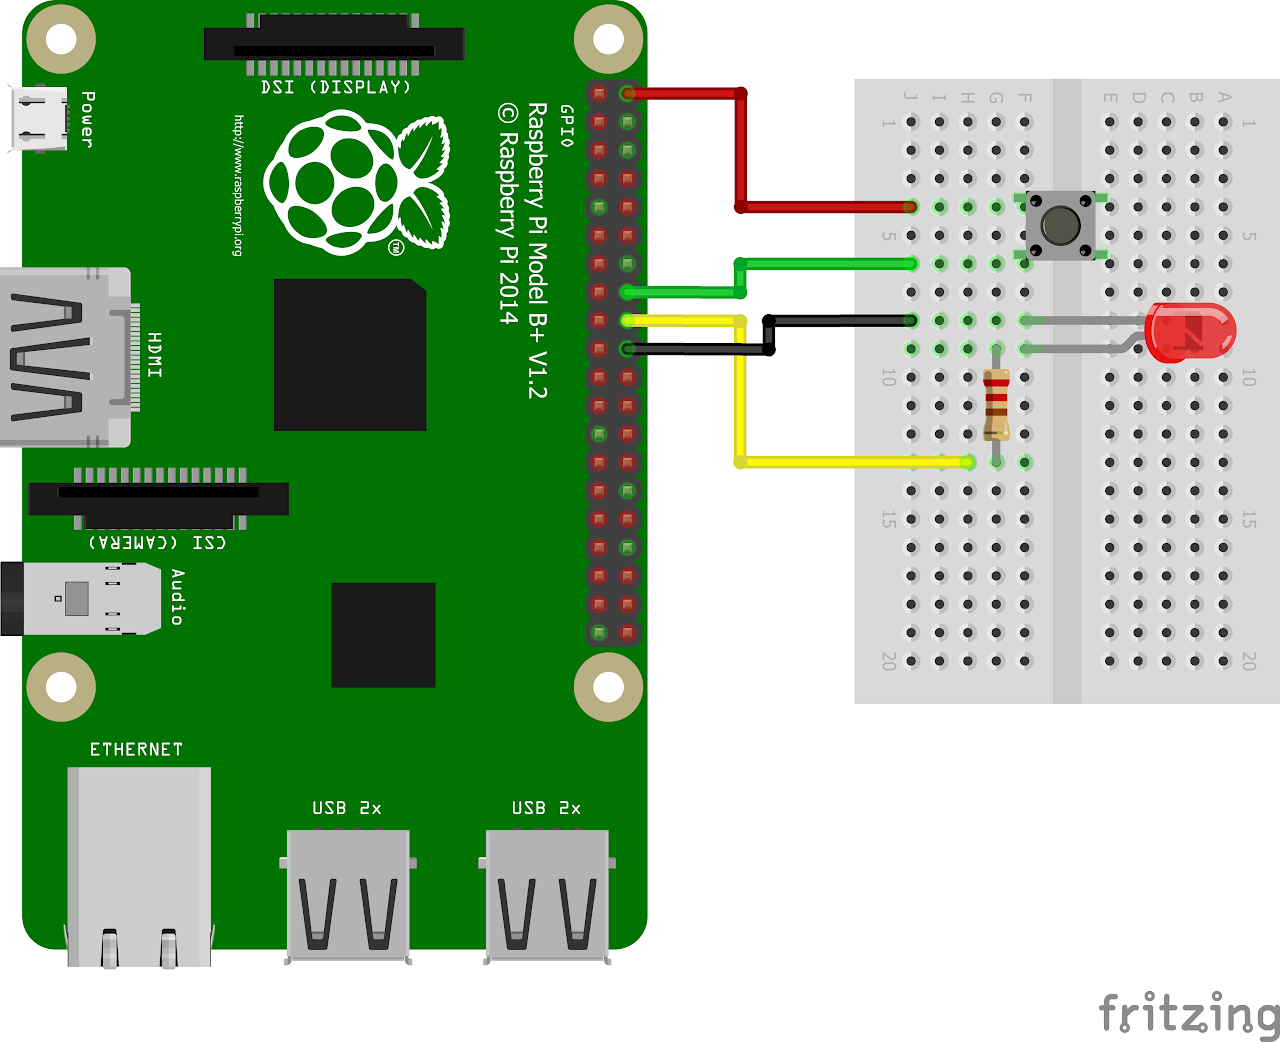
Circuit Diagram
- Connect one of the push button terminal to the 5v pin of RPi.
- Other pin of push button to GPIO23 (Pin 16) of RPi.
- Anode of the LED to GPIO24 (Pin 18) of RPi via 220 Ohm resistor.
- Cathode of the LED to GND.
In digital circuits, pull-down resistors play an important role in ensuring stable and predictable behavior, especially when interfacing with components like push buttons. When a push button is not pressed or in its default state, it is considered "open" or not making electrical contact. In this state, the signal line connected to the push button is left floating or "unconnected".
This can result in an undefined or unstable state, due to noise leading to erratic behavior in the circuit. So, In this project we will use internal pull down resistors of Raspberry Pi to eliminate this noise or unknown state. This can be achieved by giving pull_up_down argument while setting up the GPIO.
This can result in an undefined or unstable state, due to noise leading to erratic behavior in the circuit. So, In this project we will use internal pull down resistors of Raspberry Pi to eliminate this noise or unknown state. This can be achieved by giving pull_up_down argument while setting up the GPIO.
py
GPIO.setup(button_pin, GPIO.IN, pull_up_down=GPIO.PUD_DOWN)Code:
Now let's write the Python code to control the LED using the button. Follow the steps below:
- Connect to your Raspberry Pi using VNC or Desktop environment.
- Launch the Geany Python IDE or open a text editor to write the code.
- Create a new file named
switch_led.pyand save the following code into it. - You can copy and paste the following code from here into the file.
py
import RPi.GPIO as GPIO
import time

GPIO.setmode(GPIO.BCM)           # Set up BCM GPIO numbering
GPIO.setwarnings(False)          # disable warnings
SWITCH_PIN = 23                  # Set GPIO23 as button
LED_PIN = 24                     # Set GPIO24 as LED pin
GPIO.setup(SWITCH_PIN, GPIO.IN, pull_up_down=GPIO.PUD_DOWN)     # Set Switch pin as input with pull-down
GPIO.setup(LED_PIN, GPIO.OUT)    # Set LED pin as output
GPIO.output(LED_PIN, GPIO.LOW)   # Set LED to LOW
try:
    while True:
        # Check if button is pressed
        if GPIO.input(SWITCH_PIN):
            GPIO.output(LED_PIN, GPIO.HIGH)   # Set LED to HIGH if button is pressed
            print("Button pressed")
        else:
            GPIO.output(LED_PIN, GPIO.LOW)    # Set LED to LOW if button is not pressed
            print("Button not pressed")

except KeyboardInterrupt:                     # If CTRL+C is pressed, exit cleanly:
    pass

GPIO.cleanup()- Once you have pasted the code execute it by clicking on messenger like icon.
Output
Led will turn on when you press the push button and turn off when button is released in an infinite loop until you stop the program by pressing Ctrl + C.
Conclusion
In this tutorial you have successfully learned how to use a push button to control an LED on a Raspberry Pi. You have wired the components, written the Python code, and gained the ability to turn on the LED when the button is pressed and turn it off when the button is released. This project opens up a wide range of possibilities for incorporating buttons into your Raspberry Pi projects. Have fun exploring and experimenting with different applications of push button control!