Interfacing Soil Moisture Sensor with ESP32
Introduction
Soil moisture sensors are widely used in agriculture and gardening applications to monitor the moisture content of the soil. By interfacing a soil moisture sensor with ESP32, you can build a smart irrigation system or a plant monitoring system that automatically waters the plants when the soil moisture level is low. This guide will walk you through the process of interfacing a soil moisture sensor with ESP32 using the provided code.
Problem Statement
The objective of this project is to interface the Soil moisture sensor with the ESP32 and detect the moisture content present in the soil.
Requirements
To successfully complete this project, you will need the following components:
- ESP32 development board
- Soil moisture sensor
- Jumper wires
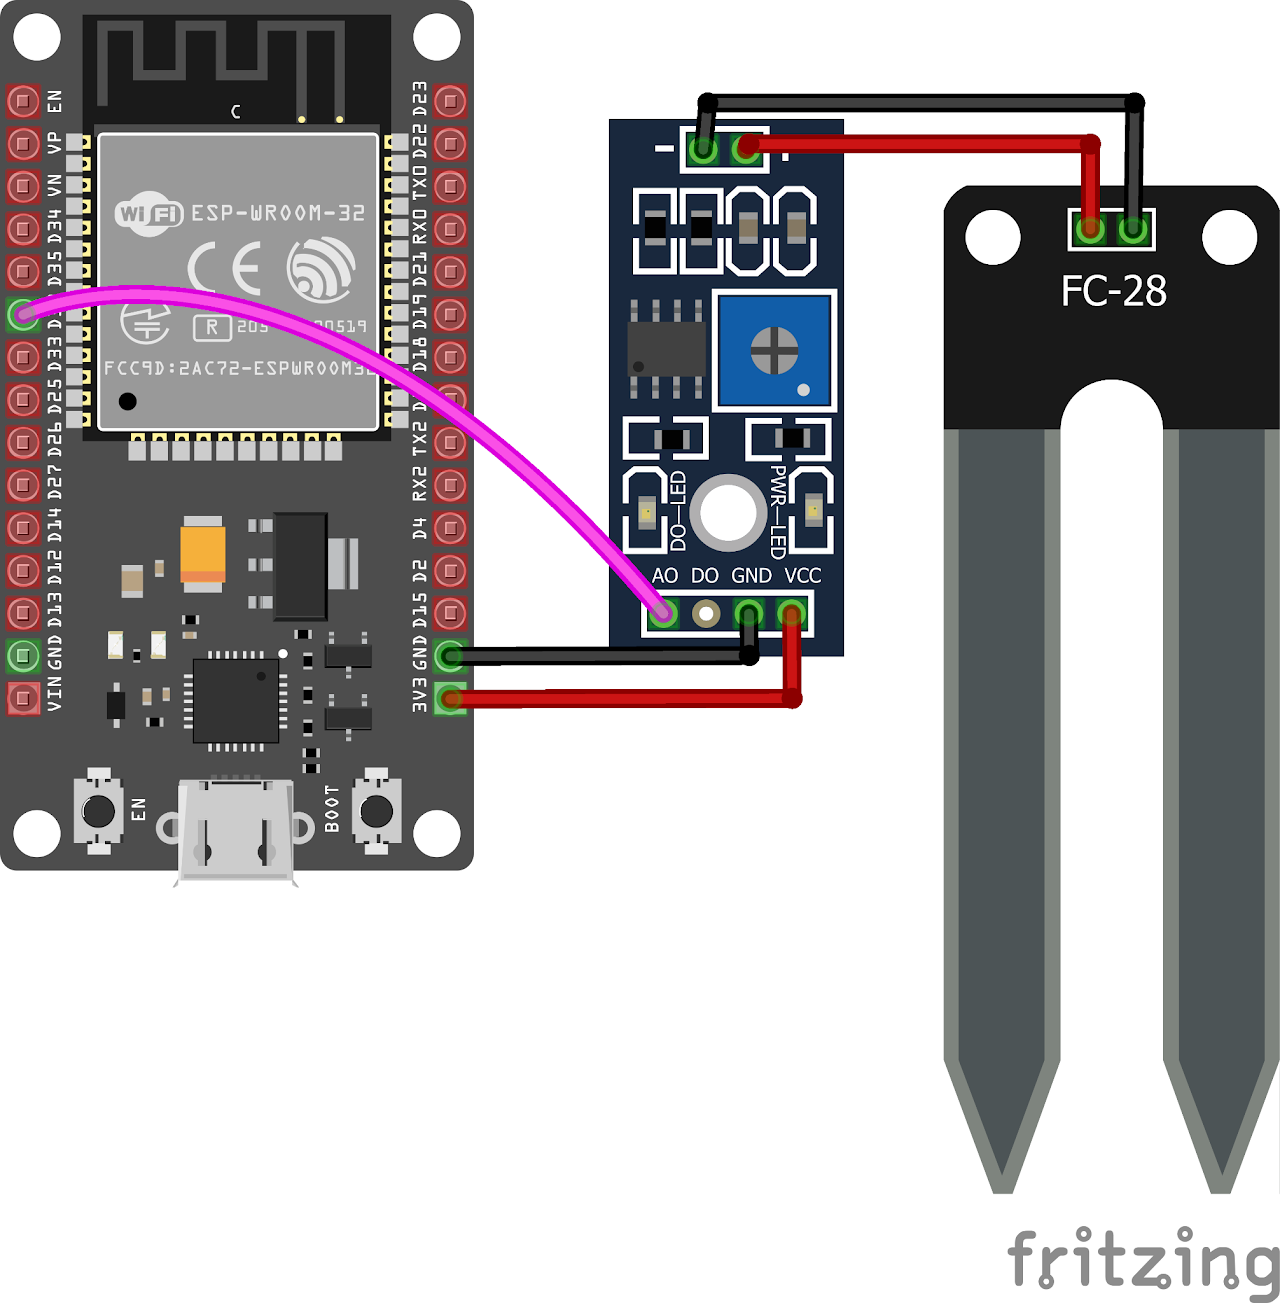
Circuit Diagram
Follow the circuit diagram below to interface the Soil Moisture sensor to the ESP32 development board:
- Connect the VCC pin of the soil moisture sensor to the 3.3V power supply pin of the ESP32.
- Connect the GND pin of the soil moisture sensor to the GND pin of the ESP32.
- The OUT pin of the soil moisture sensor to the ADC1 channel 4 pin of the ESP32 (GPIO32)
Working
The soil moisture sensor measures the moisture content in the soil by analyzing the change in resistance between its two conducting probes. The resistance between the probes varies inversely with the moisture content in the soil. By measuring this resistance, the moisture level can be determined.
The soil moisture sensor provides an analog output voltage that corresponds to the moisture level. The analog output voltage is then processed using an analog-to-digital converter (ADC) to obtain a digital value. In this case, the ADC of the ESP32 microcontroller is used.
The ADC of the ESP32 has a resolution of 12 bits, which means it can provide values ranging from 0 to 4095. The higher the ADC value, the lower the moisture content, and vice versa. To convert the ADC value to a moisture percentage, the following formula is used:
Moisture in percentage = 100 - (Analog output * 100 / 4095)
For example, if the ADC value is 2047, the moisture percentage would be 50% (100 - (2047 * 100 / 4095)).
Code:
Now let's understand and write the C code to detect the moisture in soil. Follow the steps below:
Open VS Code and create a new sample project with the name soil_moisture (Follow previous guides to see how to do it).
Now navigate to the "Main" folder of the project and then open the Main.c file.
Copy and paste the following code into Main.c or download the code from here:
#include <stdio.h>
#include <stdlib.h>
#include "freertos/FreeRTOS.h"
#include "freertos/task.h"
#include "driver/adc.h"
#include "esp_adc_cal.h"

static esp_adc_cal_characteristics_t adc1_chars;
double moisture = 0;
double sensor_value = 0;
void app_main(void)
{
    // Configure ADC
    esp_adc_cal_characterize(ADC_UNIT_1, ADC_ATTEN_DB_11, ADC_WIDTH_BIT_DEFAULT, 0, &adc1_chars);
    // Configure ADC1 Channel 4
    adc1_config_width(ADC_WIDTH_BIT_DEFAULT);
    // Set attenuation of ADC1 channel 4 to 11dB (3.9V)
    adc1_config_channel_atten(ADC1_CHANNEL_4, ADC_ATTEN_DB_11);

    while (1)
    {
        // Read ADC1 Channel 4 (pin number 32)
        sensor_value = adc1_get_raw(ADC1_CHANNEL_4);
        // Convert adc_reading to moisture percentage
        moisture = 100 - (sensor_value / 4095) * 100;
        printf("Soil Moisture is: %.2f%%\n", moisture);
        printf("\n");
        vTaskDelay(5000 / portTICK_PERIOD_MS); // wait 5 seconds
    }
}- Now at the bottom navbar of VS Code select the port, flash method and click on the Build, flash and monitor icon.
Note: During the flashing process of your board, you may encounter an error. If this happens, there's no need to worry. Simply flash the board again and when you see the message "connecting..........." appear, press and hold the boot button on your board for 1 or 2 seconds. Keep holding it until the dots on the screen start disappearing or the further flashing process begins. This action will help resolve any issues and ensure a successful flashing of your board.
Output
After uploading the code to the ESP32, the program will continuously monitor the moisture content. The serial monitor will display the moisture percentage based on the readings from the soil moisture sensor.
Adjust the moisture content in the soil (by watering or drying the soil) and observe the changes in the displayed percentage.
Conclusion
In this guide, you have learned how to interface a soil moisture sensor with an ESP32 microcontroller. By reading the analog output of the soil moisture sensor and converting it into a moisture percentage, you can monitor the moisture content in the soil. This information can be used to automate watering systems, optimize plant growth, or trigger actions based on specific moisture thresholds. Experiment with different soil conditions and moisture levels to understand the behavior of the sensor and its applications in your projects.